Choosing the right optical scope and purchasing it is only half the battle. Even the most expensive device becomes nothing more than a tube of glass if it’s not sighted in. This is a critical process during which the aiming point is aligned with the actual point of impact.
In this article, we’ll cover in detail how to properly sight in an optic, from preparing the scope to making precise adjustments. We’ll explain which way to turn the turrets on a scope, explore the difference between MOA and MRAD measurement systems, and analyze the main causes of point of impact variations. You’ll also learn how to avoid common mistakes when zeroing in to save time and ammunition.
In Brief: Which Direction to Turn the Turrets on a Riflescope
The most important rule to remember when adjusting a riflescope is that the marks on the turrets don’t indicate where the reticle itself moves, but rather where the average point of impact (API) on the target moves. If the bullet hits below the center, you need to raise the API, and if it hits to the left, you need to move it to the right.
The adjustment principle for most modern riflescopes is as follows:
- Upper turret (Up/Down). Turning it “Up” raises the API, and turning it “Down” lowers it. Accordingly, if the bullet hits below the target, We turn the turret “Up,” and if it’s higher, we turn it “Down.”
- Side turret (Left/Right). Turning it “R” (Right) shifts the point of impact to the right, and turning it “L” (Left) shifts the point of impact to the left. That is, if the bullet hits to the left of the target’s center, we adjust it “R,” and if it hits to the right, we adjust it “L.”
The turrets of a telescopic sight change the angle between the line of sight and the barrel axis. Each click is a fixed angular shift (usually 1/4 MOA or 0.1 MRAD), which at a distance translates into a specific shift in the point of impact. That’s why adjustments are made gradually (series of shots → evaluation → correction → repeat).
Preparing Optics Before Zeroing
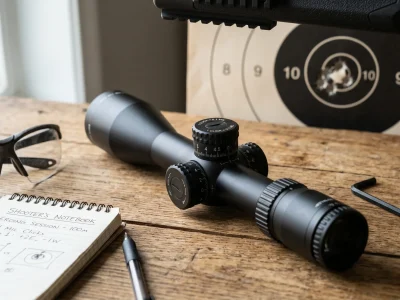
A high-quality zeroing begins not with the shot, but with the proper preparation of the weapon and optics. First, pay attention to the mount. The rings or monoblock must match the diameter of the scope tube, be compatible with the base on the weapon, and be securely fastened. All screws must be tightened evenly, without distortion or excessive force, to avoid deformation of the scope tube. Any play in the mount will cause the scope to shift during recoil, resulting in an unstable point of impact.
The next step is adjusting the sharpness of the reticle. Using the eyepiece (diopter ring), achieve the clearest possible image of the reticle for your vision. This will prevent eye strain while aiming. After this, you need to adjust the parallax—the effect of the reticle shifting relative to the target as your eye position changes. At the sighting distance, the target image and the reticle should be in the same focal plane.
A stable installation is equally important. When mounting a scope, it’s essential to properly set the eye relief so you can see the full image without darkening at the edges while maintaining a natural head position.
Sighting in a Riflescope
Sighting in is a preliminary stage of optics adjustment that is performed without actual shooting. The main advantage of this method is a significant reduction in ammunition costs and a quicker target acquisition. Sighting in is performed using a laser boresighter, which is installed in the chamber or directly in the barrel. The device projects a dot onto the target, relative to which the shooter aligns the reticle.
At the same time, it’s important to understand that sighting in is not a complete replacement for sighting in. It doesn’t take into account the ballistics of the ammunition, barrel vibration during firing, or the effect of recoil. This method only helps bring the sight closer to the target, creating a baseline for further optics adjustments during practical shooting.
Working with Adjustments: How to Read Scope Turrets
The foundation of proper optics adjustment is working with adjustments. This is where most shooters make mistakes. To avoid them, you need to understand three things: which direction the point of impact shifts when rotating the turrets, how the units of measurement (MOA and MRAD) work, and how to correctly count clicks. Let’s take a look at each in turn.
Up/Down and Left/Right: What Adjustments Shift
As we noted earlier, when working with the turret, the main thing to remember is that we are shifting the average point of impact (MPI) toward the center of the target.
The vertical turret (Up/Down) is responsible for the height of impact. Turning the turret “Up” raises the point of impact. This is necessary if bullets consistently hit below the aiming point. If the group of shots is higher, turning the turret “Down” lowers the point of impact.
The horizontal turret (Left/Right) works on the same principle, but in the horizontal plane. Turning the turret “Right” shifts the point of impact to the right, and turning the turret “Left” shifts the point of impact to the left. This means that if bullets are flying left of center, you need to adjust the turret to the right, and vice versa.
The main rule is to rotate the turret in the direction you want to shift the point of impact. This is a universal principle for most modern scopes.
MOA and MRAD: A Simple Explanation for the Shooter
MOA and MRAD are units of angular measurement that indicate how much the mean point of impact (MPI) will shift with one click of the scope’s turret at a given distance.
The MOA (Minute of Angle) system is most commonly found in American scopes. 1 MOA at 100 meters is approximately 2.9 cm (usually rounded to 3 cm for ease of calculation). The most common increment in such scopes is 1/4 MOA. This means that one click of the turret shifts the POI by approximately 0.7-0.75 cm at 100 meters.
MRAD / Mil (milliradian) — This is the metric system, which is the standard for European manufacturers and most modern tactical scopes. It’s much easier to calculate. 1 MRAD at 100 meters equals 10 cm. The standard increment in such scopes is 0.1 MRAD, meaning one click of the turret shifts the point of impact by exactly 1 cm at 100 meters.
How to count clicks and stay consistent
Zero-in accuracy directly depends on how methodically you make adjustments. To prevent scope adjustments from devolving into chaotic turret spinning, it’s important to follow a clear pattern.
Start by evaluating the shot group. Your reference point is not the individual hole in the target, but the average point of impact. Determine how many centimeters the center of your group is offset from the aiming point vertically and horizontally.
After measuring, the resulting offset must be converted into the number of turret clicks:
- MRAD system. If the scope has a rotation increment of 0.1 MRAD, then at a distance of 100 meters, one click corresponds to 1 cm. Let’s assume that the shot group is 8 cm low and 3 cm left of the center. In this case, you need to make 8 clicks in the Up direction and 3 clicks in the Right direction.
- MOA system. The calculation is somewhat more complicated, since 1 MOA at 100 meters is This is approximately 2.9 cm. The standard click of most scopes (1/4 MOA) is approximately 0.7 – 0.75 cm. Let’s assume that the shot group fell the same 8 cm low and 3 cm to the left of the center. For the elevation correction, divide 8 cm by 0.7 (8 / 0.7 – 11.4), that is, you need to make approximately 11 – 12 clicks in the “Up” direction. For the windage, divide 3 cm by 0.7 (3 / 0.7 – 4.2), which corresponds to approximately 4 clicks in the “Right” direction.
It is important to remember: if the distance differs from 100 meters, the offset is calculated proportionally. For example, at 50 meters, one click in the MRAD system corresponds to approximately 0.5 cm, and at 200 meters – 2 cm already.
To stay on track when adjusting your scope, follow these rules:
- Write down all your calculations on paper or in your phone;
- Count the drum beats out loud or silently;
- Make adjustments individually: first for elevation, then for windage;
- After each series of shots and adjustments, check to see if the group has shifted in the desired direction.
After zeroing, many shooters reset the scope’s turrets to the “0” mark. This allows them to return to the default settings if they made any temporary adjustments for distance or wind.
Specifics of Zeroing Optics on Different Types of Weapons
Each type of weapon has its own specific ballistics, recoil force, and typical firing ranges. Therefore, the process of adjusting the optics on an airgun will differ significantly from zeroing a hunting rifle or small-bore rifle.
Zeroing Optics on an Air Rifle
An air rifle has its own characteristics that directly affect the zeroing process. The main difference is ballistics. The bullet flies slower than a firearm’s bullet, has a steeper trajectory, and is more sensitive to distance. This is why errors in zeroing an airgun scope become apparent more quickly. The first point is choosing the zeroing distance. For most air rifles, the optimal zeroing distance is 10-25 meters. At this distance, the bullet’s trajectory is most stable, allowing the weapon to be used most effectively for its intended purpose. The second important factor is parallax. At close ranges, its role increases significantly. If parallax is not adjusted properly, the point of impact will “wander” depending on the position of the shooter’s eye relative to the eyepiece. It is important to ensure that the reticle and target are in the same focal plane. The third point to consider when zeroing an air rifle with a scope is its mount. Spring-piston rifles have a specific double recoil (the impulse first goes back and then sharply forward). This is why it is necessary to use high-quality monoblocs or steel rings to prevent the optics from shifting during shooting.
Adjusting a .22 LR Scope
The .22 LR caliber is one of the best options for training, target shooting, and accuracy development. However, its low recoil should not be misleading. This caliber is considered one of the most difficult to master ballistics due to the low velocity and light weight of the bullet.
How to zero a .22 LR rifle with a scope? Start by choosing a distance. The ideal range is 50 meters. At this distance, the trajectory of most cartridges remains relatively horizontal. If you set the “zero” At 50 meters, the bullet will typically hit higher by approximately 1.5-2 cm at 25 meters, and at 100 meters, it will drop by an average of 15-25 cm, depending on the specific ammunition. The .22 LR caliber is highly dependent on the cartridge’s characteristics, particularly the bullet’s velocity. Having zeroed in a subsonic cartridge, switching to a high-velocity cartridge will inevitably result in a shift in the mean point of impact. This is why zeroing should be performed using the cartridges you plan to use regularly. Particular attention should be paid to the influence of wind. The light bullet (approximately 2.6 g) is very sensitive to even weak gusts. Even a slight crosswind can cause a noticeable horizontal shift. Therefore, zeroing is recommended in perfectly calm weather, so that horizontal deviation is determined solely by the scope settings and not by external factors.
Zeroing in the Optics on a Rifle
Zeroing in the optical sight on a rifle has its own peculiarities. Here, the bullet trajectory is flatter, and the influence of external factors is less critical. However, errors during zeroing can lead to significant deviations even at distances of 100+ meters.
The first key point is choosing the distance. The most common option is 100 meters. It is at this distance that the potential of a rifled weapon is best revealed, and calculating ballistic corrections for 200, 300, or 500 meters becomes as linear and straightforward as possible.
The second factor is shooting stability. Due to the rifle’s recoil, any aiming error or instability of the rest will cause the point of impact to deviate. This is why it’s essential to use special rests, bipods, or sandbags when adjusting the optics. It’s important that the rifle returns to the same position after firing, and that the sight is securely fixed with high-quality rings.
Barrel heating is also important to consider. During continuous firing, the rifle heats up quickly, which can affect accuracy. Therefore, it’s best to zero the scope when the weapon is cold. To do this, fire a series of 3-5 shots with pauses of several minutes. This allows for a more stable picture and avoids errors when making adjustments.
Particular attention should be paid to ammunition. Different manufacturers, bullet weights, and cartridge types can result in different mean points of impact. Therefore, optics should be adjusted using the ammunition that will be used in the future.
Checklist: Why a Bullet Is Flying Wrong
There are situations where, even after carefully zeroing the scope, the bullet, for some reason, is flying off target. If you encounter this problem, review this list to find and fix the cause:
- The optics and barrel are misaligned. If the scope is mounted at an angle relative to the barrel axis, adjustments will be made diagonally. This often occurs when the rails or rings are poorly installed.
- The scope mount is unstable. Even minimal play in the screws causes the scope to “shift” after each shot. Check the tightness of the mounts, especially if you are shooting a large-caliber weapon.
- Incorrectly adjusted parallax. If the target image and the reticle are not in the same plane, the slightest eye movement will shift your aiming point. This is critical at long ranges and at high magnification.
- The weapon is unstable. Each shot should be fired with the same buttstock pressure and cheek position.
- Trigger pull errors. Incorrect trigger finger position will cause the barrel to move at the moment of firing. Even perfectly adjusted optics will not compensate for trigger pull errors.
- Optics adjustment based on individual shots. The scope should be adjusted based on the average point of impact of a 3-5 shot group to eliminate random factors.
- Incorrect click counting or MOA/MRAD confusion. Using a 1 cm per click value for an MOA scope will result in a significant miss. Always check the units of measurement used by the turret.
- Changing ammunition. Bullets of different weights or even from a different batch of the same manufacturer have different ballistic characteristics.
- The influence of external factors. Crosswinds, temperature, and other factors affect the bullet’s trajectory.
- Mechanical damage to the sight. If the adjustment mechanism inside the optic is damaged or the lens is displaced, the STV will change unpredictably.
This checklist allows you to quickly identify the root cause of the point of impact shift.
You should contact a specialist to zero your optical sight on a small-bore or large-bore weapon in two main cases:
- if you lack practical experience and a clear understanding of how to perform this process;
- if independent attempts do not produce consistent results.
In such situations, a specialist will help you properly adjust the sight and zero the weapon without wasting time and ammunition.
If you still want to adjust the sight yourself, you can do it at our shooting range. All the conditions for accurate and comfortable shooting are created here – fixed distances, ergonomic shooting positions, and professional rests for maximum weapon stabilization.